Are you looking to create engaging content for your followers/ readers? With advancements in technology at our fingertips nowadays, the choice can often be overwhelming. There’s a whole host of professional editing suites available to use, not to mention the variety of equipment for us to utilise.
The question is, is it possible to produce great photography like a professional, without spending a fortune? I shoot all of my images with my iPhone 6S and use editing apps that you can download straight to your phone, so I can assure you the answer is absolutely! Check out these hacks that will have you creating dreamy content to keep your followers/ readers coming back for more.
The rule of thirds
Pictures can often be more interesting when they aren’t centre focused. Imagine your camera screen is divided into a grid with nine parts, generally speaking, your phone or camera will have a grid mode that you can activate in the settings to do the work for you. In a nutshell, the theory is that if you line up focal points with the intersections of the grid, then the image will become naturally balanced.

For landscape images, try positioning the horizon along one of the horizontal lines to create a point of interest.
You can apply the rule of thirds in post-production too. Loads of editing programmes have the ability to crop and reframe your images and allow you to apply the rule of thirds.
Download a good picture editing tool
I’m obsessed with Google’s Snapseed app, and I know a lot of fabulous bloggers who also rave about it. The app is probably the closest thing on the market to Adobe Photoshop, and it is suitable for novices and pros alike. It’s very intuitive to use so you’re in good hands.
In the tools section of the app, you can choose from creative photo frames, textures, and lighting effects. Edit images by rotating or cropping them. You can correct the perspective of the image and adjust the white balance of your images too.
For a little something extra try the healing tool, vignette, lens blur, or glamour glow filters. Or change the effect of the image entirely with one of the other many filters available; add drama, or give images a vintage feel, or even add texture with grunge.
There are other tools to control brightness levels, and you can apply filters specifically for head poses, portraits, double exposure, and even add text to images.
For most of the tools, you can either create your own edits or use the automatic mode to best enhance your pictures. Once you find the edits you like, you can save them and reapply them to other images, which is great for your social media accounts when you are trying to have a consistent look and feel. And the best thing about the app is, it’s free!
Tip: For pictures with low overexposed lighting, try the Morning filter. It does wonderful things!
One of my other favourite effects to experiment with at the moment is tilt shift. You can use it to create the illusion of shooting miniature models, or draw focus to points in your pictures.
Avoid shooting with flash
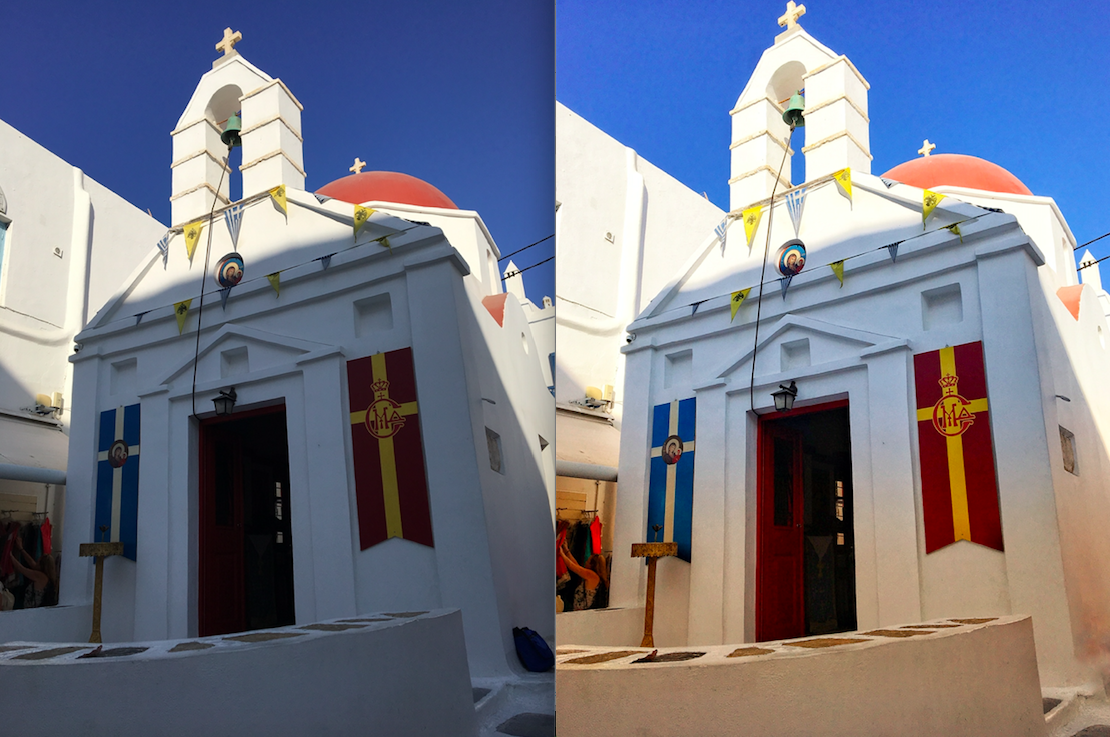
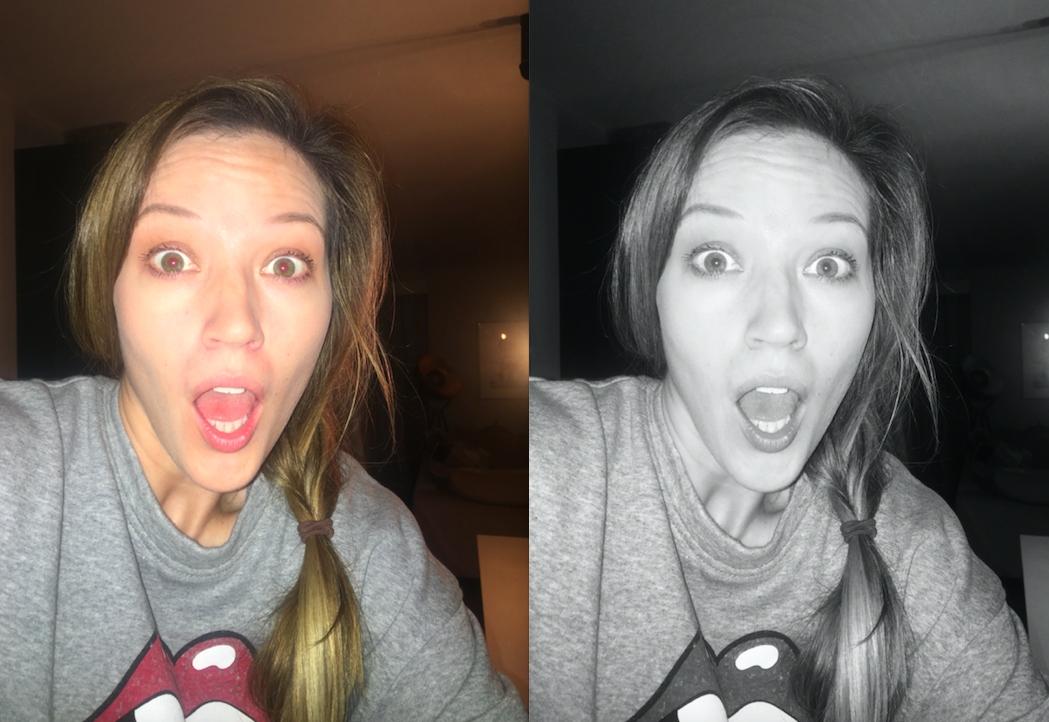
I see so many people taking pictures indoors with flash and admiring their overexposed ghostly subjects. It’s just not a good look for anyone. Using an inbuilt flash whether it be on your phone or camera, often results in harsh shadows, excessive red-eye, hot spots and highlights from reflective surfaces. If you have any of these frightful overexposed images in your collection, try experimenting with black and white filters, they often soften the harshness of the lighting, and if anything, the over exposure seems to brings more clarity to the structure and tonal composition. Plus, they are oh so chic.
Either shoot where there is better light, or enhance the exposure post-shoot with an editing app.
So, when should you use the flash? Switch it on when you are shooting into a bright background. It will illuminate your subject in the foreground, ensuring you are not left with silhouettes.
Look for the light
This is a basic one, but people often overlook it. Tyra Bank’s infamous Top Model tip was if you are the subject, “find the light”! Move you face towards the light, but avoid direct exposure. Equally, if you are shooting a subject, have your back to the light and ensure they are looking towards it. But remember, shooting directly into the it will create harsh unflattering lines.
Avoid using zoom
It can be tempting to zoom in when shooting from a distance, however, have you noticed that when you do the images often become distorted and grainy? So, don’t do it! Try and get closer, and if that’s not possible then shoot from a distance and crop later. This way you’ll avoid compromising the quality of the shot.
Take the perfect portrait
If you are styling out an older model smart phone, try using Instagram’s focus mode to create the perfect portrait. Open up your app, and in the top right-hand corner, you will see a camera icon. Select it, and then scroll along the bottom until you find focus. This effect is much like the portrait mode on the newer iPhones. Take your picture and then save to your camera roll. The resolution is surprisingly good and they print well too.

These helpful tips will have you on your way to shooting like a pro in no time. And, remember to be creative and experiment. The number one rule of photography is to take your foundation knowledge of the basic principles and challenge the rules and find your own unique style.
Jas is a travel content creator and social media influencer at https://www.jetsetwithjas.com. She is a brand ambassador for a jewellery designer and contributes monthly to their blog. A self-proclaimed travel junkie, Jas is passionate about affordable luxury travel, and her motto is “get the best for less”. On her blog, you’ll find anecdotes from her travels along with helpful travel tips. Find her @jetsetwithjas on Instagram, Facebook, Twitter and YouTube.
Comment